<a href="http://www.bloglovin.com/blog/10580857/?claim=ub727utyenj">Follow my blog with Bloglovin</a
Saturday, September 7, 2013
Sunday, August 11, 2013
Be Bangled!
So as you can tell I get obsessed with things and I go with it until it is out of my system.
 Gem show success!
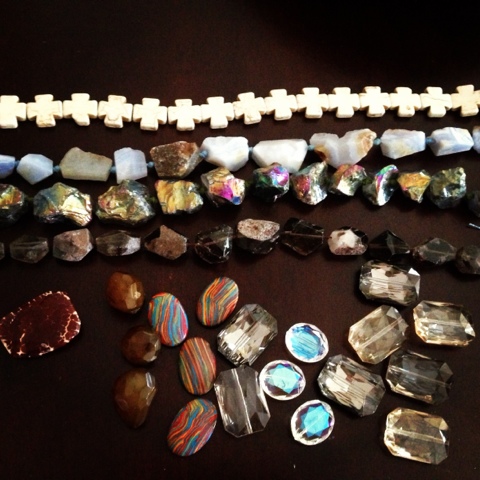


I am big on the DIY notion of "oh I can do that myself" when I see something I love that is just ridiculously over priced. So enter my bangles..
My coworker got me hooked on these bangles on a Facebook page they were unique, gorgeous, and unlike anything I've ever seen. So I was all excited and messaged for a price on a few and was floored to see $25-$45 a piece- mind you we are not talking real gold or silver but wired bangles. I just couldn't justify this purchase.
So I was meandering around JoAnns one Saturday for baby blanket fabric when I see beading wire and beads on clearance so I think I bet I can make these bangles. So I purchased 18 gauge gold color tarnish resistant wire and large glass baubles.
Not thinking I would need any special pliers I get home and begin this painful and I mean painful hand wiring process..
My first attempt was not great but it was not horrible for being completed by hand. I will save you any horrid photos.
It showed me how easy it was. so I got smart and bought a wire beading tool set nothing fancy just two varieties of pliers made for jewelry wire and wire cutters. You can find a similar 3 piece set here: www.consumercrafts.com
So began the bangle obsession. I scoured JoAnn's and Michael's for glass and other ornate large beads that could easily be wired for a bangle. My coworker began doing the same thing. We have been to several local gem shows and beads stores here in the Cincinnati, Oh area.
The local favorite is A World of beads in Hyde Park. Website: aworldofbeads.com
If you are looking for something special I encourage you to go they are fantastic!
So maybe someday my friend and I will create an etsy page for our Gemmed bangles but for now I leave you with some of my favorites!
The beauty is my favorite piece stone courtesy of world of beads!
Do you bangle?
Wonton everything!
So I've began a new Health journey. About two months ago I had a biometric screening at let's just say it scared me enough to get my ass in gear! I use myfitnesspal app to keep myself in check with 1200 calorie diet and try to work out as much as I can which with said big boss job it is challenging. But don't think I don't count my vigorous cleaning spells and walking around couponing on my lunch hours. I'll make a separate post about all the great couponing blogs I've found!
For now I leave you with the best breakfast idea ever!
With my new healthy lifestyle it has included removing most dairy, red meat, soda and other processed sugars from my diet. I eat primarily raw veggies, almond milk, fresh fruit, and lots of tofu, boneless white meat chicken, and fish.
So I was elated to discover wonton wrappers I know, I know where have I been right?! But it was a steal at my local Kroger at 99 cents a pack!
So my mind went to work and by work I mean Pinterest! So I've tried all kinds of hungry girl and other yummy goodies but these are my own version of quick breakfast perfection!
Egg white wonton cupcakes
Ingredients:
1/4 cup Go Veggie shreds in cheddar and pepper jack
12 wonton wrappers I used Nasoya
4 TBS Egg Beaters 100% egg whites

Method:
I used Pam olive oil spray to spray each muffin tin. Place one wonton wrapper in each cupcake mold, pour 1-1.5 teaspoons of egg beater into wrapper and sprinkle approx 1 teaspoon of Go veggie shreds. Bake at 375 for about 15 minutes until edges are golden brown and the egg white has set.
I served with fresh raw berries. They are so good you don't even need to spice.
Enjoy!

Saturday, December 1, 2012
Photo Card

Wrapped Bone Holiday
Create custom new year's invitations at Shutterfly.com.
View the entire collection of cards.
Wednesday, July 4, 2012
Hounds-tooth obsession!
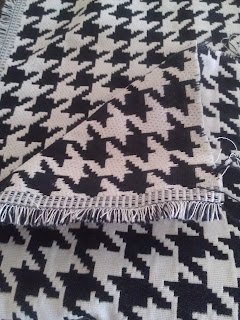
My friends I am in love with hounds-tooth print! Why I do not know but I just adore it in all of its old wonder :)
Along with loving hounds-tooth fabric I love a good fabric sale! I had gone to Hobby Lobby seeking a finale' for my Mom who is saving an antique lampshade when I stumbled upon a box of fabric pieces leftover for sale. In this box of wonder I found 1 and 3/4 yard of hounds-tooth upholstery fabric. And I thought hmmm...new clutch yes please!
 This is where the obsession started I bought these a few months ago and I was hooked! <3
Tools:
outside fabric for clutch (I would use a thicker fabric for sturdiness)
inside fabric: think either cotton or satiny- I used an old satiny shirt from the thrift store a steal at .29 cents!
Button of choice (I used a large chunky button found as a single button from Joann's)
snaps: (I used basic snaps with a snap machine but you could use a magnet or larger snap)
scissors
pin
thread to match fabric
Step 1: I began by deciding the shape of my clutch. I laid the hounds-tooth fabric out and trimmed to the size I needed. Make sure to cut off any loose ends to ensure nothing is sticking out on the finished project.
Step 2: I took the old stain ladies shirt and cut the back out along the seam of the arms and neck of the shirt.

 Step 3: I began to pin the fabric together so that the satin would be on the inside and edged with the hounds-tooth fabric.
 Step 4: Once the fabric was pinned I began to stitch around the edges leaving .5 inch for me trim before folding the edges over.
 Step 5: Once the red interior fabric was completely attached I trimmed the excess and folded the right and left sides to create a large rectangular envelope shape. I had 1 inch sides.
Step 6: To finish the clutch I used a "random zig-zag" stitch shown here random zig-zag stitch so that it would mimic the hounds-tooth print.I sewed the left and right side about 4-5 inches up each side with a 1 in trim on each side. I left the top open so that I could attach the snaps and button.
Step 7: I used a plastic snap attachment to attach the snaps to the top (flap) and bottom (base) of the clutch.
Step 8: After attaching both snaps I folded the flap about 2 inches again looking like a straight flap envelope and stitched the trim edge around the flap.
Step 9: Adding the button: for this piece it was purely decoration but could be done as the actual closure on the clutch.
Here's the finished project!


Another success! There are a few things I would change on the next one like using a magnetic clasp and folding the trim more closely so that no edge shows when opening the inside.
But very happy and ready to try it out this weekend! :)
Along with loving hounds-tooth fabric I love a good fabric sale! I had gone to Hobby Lobby seeking a finale' for my Mom who is saving an antique lampshade when I stumbled upon a box of fabric pieces leftover for sale. In this box of wonder I found 1 and 3/4 yard of hounds-tooth upholstery fabric. And I thought hmmm...new clutch yes please!
This is where the obsession started I bought these a few months ago and I was hooked! <3 Tools:
outside fabric for clutch (I would use a thicker fabric for sturdiness)
inside fabric: think either cotton or satiny- I used an old satiny shirt from the thrift store a steal at .29 cents!
Button of choice (I used a large chunky button found as a single button from Joann's)
snaps: (I used basic snaps with a snap machine but you could use a magnet or larger snap)
scissors
pin
thread to match fabric
Step 1: I began by deciding the shape of my clutch. I laid the hounds-tooth fabric out and trimmed to the size I needed. Make sure to cut off any loose ends to ensure nothing is sticking out on the finished project.
Step 2: I took the old stain ladies shirt and cut the back out along the seam of the arms and neck of the shirt.


Step 6: To finish the clutch I used a "random zig-zag" stitch shown here random zig-zag stitch so that it would mimic the hounds-tooth print.I sewed the left and right side about 4-5 inches up each side with a 1 in trim on each side. I left the top open so that I could attach the snaps and button.
Step 7: I used a plastic snap attachment to attach the snaps to the top (flap) and bottom (base) of the clutch.
Step 8: After attaching both snaps I folded the flap about 2 inches again looking like a straight flap envelope and stitched the trim edge around the flap.
Step 9: Adding the button: for this piece it was purely decoration but could be done as the actual closure on the clutch.
Here's the finished project!


Another success! There are a few things I would change on the next one like using a magnetic clasp and folding the trim more closely so that no edge shows when opening the inside.
But very happy and ready to try it out this weekend! :)
Children's crafts
Sometimes when I come up with a new craft idea I think man I wish I had a little one to do this for...But that is why my friends and family have kids so I can dote on them with my new projects:) One of my bestie's little one turned two this winter and immediately I thought what do little girl tots love to do? PLAY DRESS UP! So the idea for a dress up box was born!
For the project I don't have any before pictures but I will do my best to explain what I used and the process in which I completed the box!
Tools:
-1 large wooden box- I found one at Hobby Lobby for a 1/4 of the original price
-sand paper
- spray paint (I used Krylon brushed metallic) I have to say I was not happy with the color as it turned out it was not "caramel latte" as seen here http://www.krylon.com/products/brushed_metallic/ it came out mostly silver and was very spotty I used a rubber glove to mix the color.
-felt (color of choice, I used Hot pink)
-pre -painted wooden shapes-I used the following:
*princess crown
*unicorn
*treasure chest
*the letter A
*mirror
*castle
-clothing, and accessories for dress up.
This was the best part! Party City, Michael's crafts, Target dollar section, and Hobby Lobby made this so easy! Kids can entertain themselves for hours with the littlest things so have fun with this!
Step 1: Sand wooden box/chest and paint
I laid newspaper in the garage and left the door half way up (this was a very windy February day) I would recommend full ventilation. I sanded the box so that it was smooth-you don't want the child getting a splinter etc.
After sanding and wiping off excess dust it is time to paint!
Step 2: Painting the box was the hardest part as I stated the paint was not at all what I expected it was blotchy and I had to use a rubber glove to get a smoother color and more metallic finish. I did probably about 4 coats to get the box completely covered and blended well.
Step 3: Let the box dry. After 2-3 hours of drying time I measure the inside of the box and lid in order to cut the felt to add to the inside. I used Elmer's wood glue and glued each side of the box and lid separately. After the felt is added I allowed it to dry before adding the wooden decals to the outside.
Step 4: I added the wooden decals also using Elmer's wood glue. I placed them on 2 sides and the lid.
Step 5: add the costume fun and tie with a bow :)
The finished project:


It was a hit :) Craft success!
Wednesday, April 4, 2012
Scarves!
So the ever popular accessory the scarf! I have to admit I am a bit smitten myself. I have been making several and find it is best to use stretchy and thin weight material otherwise you end up with bulky heavy scarf and who wants that in this lovely spring time weather?
So I am loving tee shirt material it is a versatile fabric with so many uses! For this project I used black tee shirt material $5.99/yrd at JoAnns used a 40% off coupon for this and a filigree designed tee shirt material found on a clearance isle at Walmart for $1.88/yrd. I had two yrds of each material and cut it vertically to utilize the length of the scarf and to get the double sided look I wanted.
 So once I had my pieces trimmed. I placed the fabric with front sides together and pinned all the way around the material. I sewed three sides together completely with about 1/8 of a inch of material as my seam. Once I had three sides sewn I worked on the third I stopped about 3/4 of the way down the third side leaving an opening for me to turn the scarf right side out.
 So I started with the corners and a closed lid ink pen to push the corners out. Since the fabric is stretchy this part was a breeze! Once the scarf was turned out correctly I sewed my opening shut. This is the final result. Still needs some ironing.
 There you have it another successful accessory on a budget! For one scarf cost is $5.47!
So I am loving tee shirt material it is a versatile fabric with so many uses! For this project I used black tee shirt material $5.99/yrd at JoAnns used a 40% off coupon for this and a filigree designed tee shirt material found on a clearance isle at Walmart for $1.88/yrd. I had two yrds of each material and cut it vertically to utilize the length of the scarf and to get the double sided look I wanted.
 So once I had my pieces trimmed. I placed the fabric with front sides together and pinned all the way around the material. I sewed three sides together completely with about 1/8 of a inch of material as my seam. Once I had three sides sewn I worked on the third I stopped about 3/4 of the way down the third side leaving an opening for me to turn the scarf right side out.

Subscribe to:
Comments (Atom)